
Who is this for?
✓ Teachers or Admin users with Admin access in Agilix Buzz.
✓ Requires a Kami paid plan.
Already have the Kami external tool integration installed? Learn more about using Kami with Agilix Buzz.
What is the Kami external tool integration for Agilix Buzz?
The Kami external tool integration helps you get the most out of your Agilix Buzz workflow. With this installed, you can:
- Create Kami assignments in Agilix Buzz.
- Give feedback and grade Kami assignments.
- Sync your feedback or grading annotations in real time.
- Use the Questions AI tool to level up your assignments or create assessments.
- View student progress in real time with Class View, or make immediate changes in Edit Assignment.
Installing the Kami external tool integration
1. Navigate to your Kami License Dashboard via the Account & Settings menu in Kami or by going directly to customerpanel.kamihq.com.
2. On the left-side menu, select the Learning Management Systems tab, then select LTI 1.3. On the LTI 1.3 registrations page that opens, select the New Agilix Buzz Registration button. Keep this page open, as it will be used in a later step.
-png.png?width=670&height=329&name=LTI_1-3%20(1)-png.png)
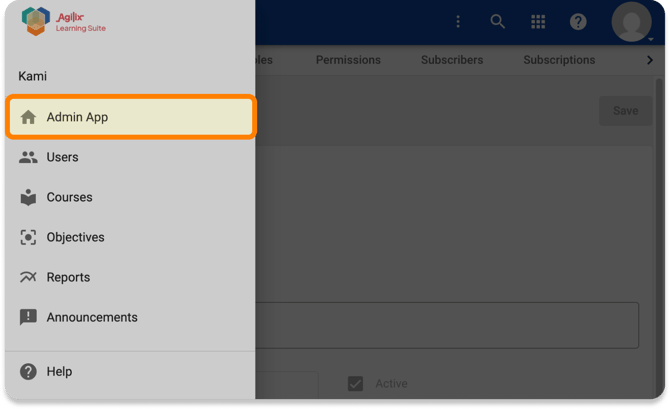
3. In a separate tab, log in to your Agilix Buzz environment and navigate to the Admin app by opening the left-side menu (from the upper left corner), then choosing Admin app from the menu options.
4. Once in the Admin app view, select the settings (⋮) button from the top toolbar, then select Domain settings.
-png.png?width=670&height=439&name=AgilixBuzz%20(1)-png.png)
5. On the left side panel, scroll down and select LTI 1.3 tools. In the view that opens, select the Add button to create a new registration.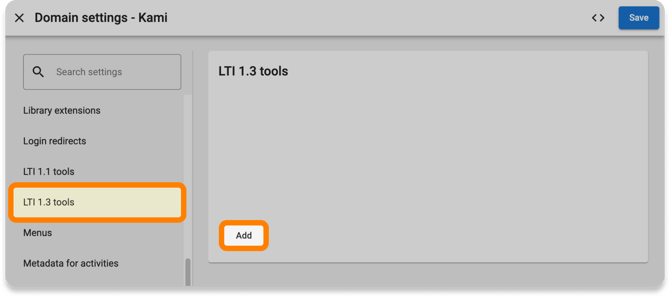
6. In the registration window that opens, you'll be prompted to add the LTI details for the Kami app. First, enter 'Kami' in the Name field, then fill in the remaining required fields with the following values:
| Initiate login URL | https://web.kamihq.com/api/lti/oidc/auth/login |
|---|---|
| Launch / Redirect URL | https://web.kamihq.com/api/lti/oidc/auth/redirect |
| Keyset URL | https://web.kamihq.com/api/lti/oidc/auth/keys |
Note: You can also find these values on the Connect Kami to Agilix Buzz with LTI 1.3 registration page in the Kami License Dashboard (opened in step 2). They are the same for every school/district.
-png.png?width=670&height=448&name=AgilixBuzz%20(2)-png.png)
7. After entering the above values, scroll down to the LTI services setting. Update this to have all three available options (Assignment and grade, Names and role provisioning, and Deep linking) selected.
This will allow Kami assignments to be created, submitted, and graded in your courses when the Kami external tool integration is used.
-png-1.png?width=670&height=447&name=AgilixBuzz%20(1)-png-1.png)
8. Scroll to the bottom of the window and enable the two available options:
- Domain-wide (applies to the descendant domains)
- Enabled
When finished, select Done.
-png-1.png?width=670&height=361&name=AgilixBuzz%20(2)-png-1.png)
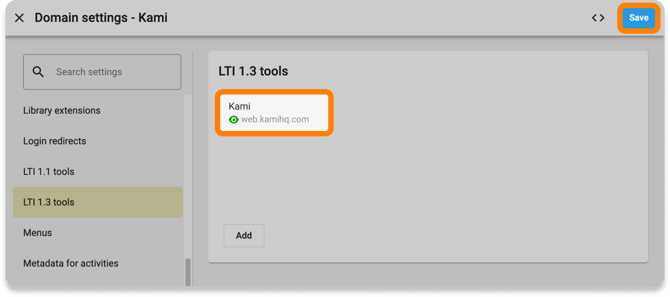
9. After the Kami LTI tool has been added, select Save in the upper right corner. Then, select it from your list of LTI 1.3 tools to reopen the configuration window.
9. Scroll down to the greyed-out parameter fields, starting with Client ID.
Copy and paste these values into the corresponding fields on the Connect Kami to Agilix Buzz with LTI 1.3 registration page in the Kami License Dashboard that was opened in step 2.
When finished, select Connect LMS.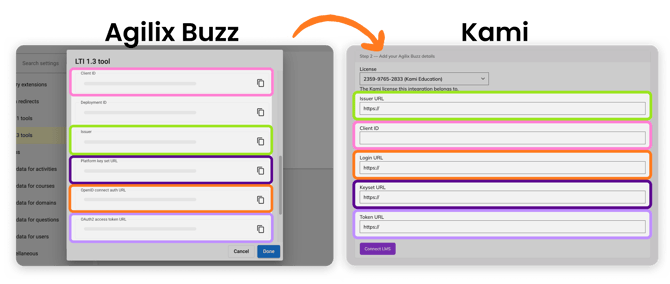
After you complete the steps above, your new Agilix Buzz registration will appear on the License Dashboard LTI 1.3 registrations page with a status of 'Waiting for first launch'.
Once Kami has been used in Agilix Buzz, this status will automatically change to 'Launched'.
-png-3.png?width=670&height=254&name=AgilixBuzz%20(1)-png-3.png)
If any changes need to be made, you can select the View button to Edit or Delete the registration. However, after the status changes to 'Launched', or if the license has expired, you will need to contact support@kamihq.com to change or remove it.