
Who is this for?
✓ Google Admin users.
✓ This is a free extension; users on any Kami plan can use this.
Already have the Kami Chrome Web Store extension installed and deployed to your organization? This may need to be updated to avoid conflicting with the Kami Private Chrome extension. For guidance, refer to this section.
How to install the Kami Private Chrome Extension
1. Navigate to your Kami license dashboard and select the Manage License button next to your listed Kami License.
📝 If you have multiple licenses (i.e. Kami Education and Kami Companion), these steps only need to be done for one license, as both apps use the same extension.
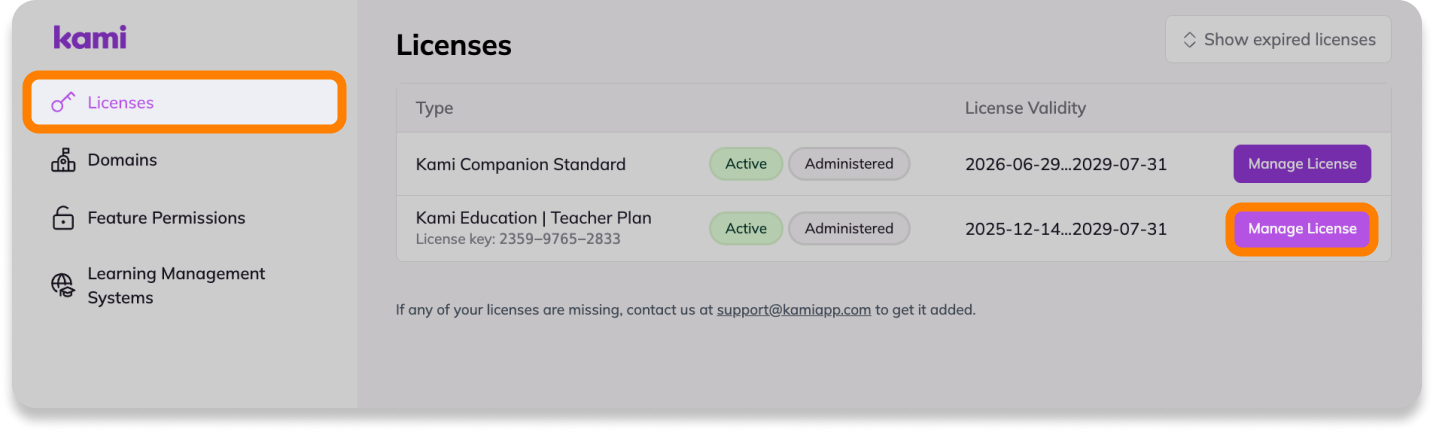
2. Open the Private Chrome Extension tab, where you'll find the Extension Manifest XML file and the Policy for extensions value to be used for the install.
Keep this page open, as you will need to refer back to it in steps 9 and 13.
-png-Aug-11-2026-10-08-32-3064-PM.png?width=670&height=400&name=Screenshot%20Template%20(Insert%20image)-png-Aug-11-2026-10-08-32-3064-PM.png)
3. In a separate browser tab, open the Google Workspace Admin Console. In the left-side menu, navigate to the Apps & extensions page (either via Chrome browser > Apps & extensions, or via Devices > Chrome > Apps & extensions).
-png.png?width=670&height=295&name=Group%201010107045%20(2)-png.png)
4. On the Apps & extensions page, open the Users & browsers tab, then expand the Organizational Units drop-down on the left-side panel and select the desired domain or individual organizational unit to deploy the extension to.
-png.png?width=1275&height=801&name=Private_Extension%20(1)-png.png)
5. With your desired domain or organizational unit selected, select the Add button (yellow circle in the bottom right corner).
-png.png?width=1275&height=801&name=Private_Extension%20(2)-png.png)
6. Select Add Chrome app or extension by ID from the expanded list of options.
-png.png?width=1275&height=801&name=Private_Extension%20(3)-png.png)
7. In the window that opens, select the From the Chrome Web Store setting and change it to From a custom URL. This will populate a URL field to be used in the next step.
-png.png?width=1275&height=729&name=Private_Extension%20(4)-png.png)
8. In the Extension ID field, enter the following Extension ID:
nnodfkaddobobljgmbfkdehclgknngbo
%20(3)-png-Aug-11-2026-10-25-26-5924-PM.png?width=670&height=378&name=Screenshot%20Template%20(Insert%20image)%20(3)-png-Aug-11-2026-10-25-26-5924-PM.png)
9. For the URL field, refer back to your Kami License Dashboard (opened in step 2) and select the Copy Link button to the right of the Extension Manifest, then paste this into the URL field.
%20(1)-png-Aug-11-2026-10-16-23-8992-PM.png?width=670&height=400&name=Screenshot%20Template%20(Insert%20image)%20(1)-png-Aug-11-2026-10-16-23-8992-PM.png)
10. After adding both values, select Save to complete the install.
-png.png?width=1275&height=879&name=Private_Extension%20(6)-png.png)
11. The extension will now appear in the list of installed Apps & Extensions for the selected domain or organization unit. Find and select the extension from this list to open its settings panel.
%20(4)-png-Aug-11-2026-10-44-09-1629-PM.png?width=670&height=407&name=Screenshot%20Template%20(Insert%20image)%20(4)-png-Aug-11-2026-10-44-09-1629-PM.png)
12. For the installation policy setting (located at the top of the panel), click the drop-down arrow and select Force install + pin.
This enables the extension to be automatically installed for all users within the selected domain/organization unit, with the extension icon pinned in their browser bar for easier access.
%20(6)-png-Aug-11-2026-10-48-00-1882-PM.png?width=670&height=372&name=Screenshot%20Template%20(Insert%20image)%20(6)-png-Aug-11-2026-10-48-00-1882-PM.png)
13. Next, scroll down to the Policy for extensions setting.
For this value, again refer back to your Kami License Dashboard (opened in step 2) and select the Copy Policy button to the right of the Extension Policy.
%20(2)-png-Aug-11-2026-10-52-24-7607-PM.png?width=670&height=400&name=Screenshot%20Template%20(Insert%20image)%20(2)-png-Aug-11-2026-10-52-24-7607-PM.png)
Paste this value into the Policy for extensions field. When finished, click Save in the upper-right corner of the screen.
%20(8)-png-Aug-11-2026-10-51-14-8571-PM.png?width=670&height=356&name=Screenshot%20Template%20(Insert%20image)%20(8)-png-Aug-11-2026-10-51-14-8571-PM.png)
14. After saving, scroll down to the Deployment settings section, which will now be visible at the bottom of the panel.
Find the Update URL setting, then click the drop-down arrow and select the Installation URL option. When finished, click Save in the upper-right corner of the screen.
-png.png?width=1167&height=843&name=Private_Extension%20(7)-png.png)
Once you complete the steps above, the extension will deploy and be visible in Chrome for all users in the selected domain/organization unit.
📝 This extension may not become visible to users with a managed device if there is a policy in place preventing it from deploying to their browser. Please review this to ensure all users will have access to the extension after installing.
If there's another Kami extension installed, ensure your Chrome Web Store extension won't conflict with the Kami Private extension
If the Kami Chrome Web Store extension has also been installed and deployed to the same domain/organization, the installation policy may need to be changed to avoid conflicting with the Kami Private Extension.
Refer to the steps below for assistance:
1. Navigate to the Google Workspace Admin Console. In the left-side menu, open the Chrome browser tab, then select Apps & extensions.
-png.png?width=500&height=220&name=Group%201010107045%20(2)-png.png)
2. In the Users & browsers tab, expand the Organizational Units drop-down on the left-side panel and select the desired domain or individual organizational unit the extension has been deployed to.
-png.png?width=670&height=421&name=Private_Extension%20(1)-png.png)
3. In the list of your installed Apps & Extensions, find and select the Kami for Google Chrome extension to open the settings panel.
-png-1.png?width=1167&height=627&name=Private_Extension%20(2)-png-1.png)
4. In the settings panel, locate the Installation policy setting. This must be set to a policy that allows it to be disabled. To change this, select the setting, then choose one of the following options:
• Force install, allow users to disable
• Force install + pin to browser toolbar, allow users to disable
• Allow install
-png-1.png?width=1167&height=738&name=Private_Extension%20(1)-png-1.png)
5. When finished, select Save in the upper right corner of the window.
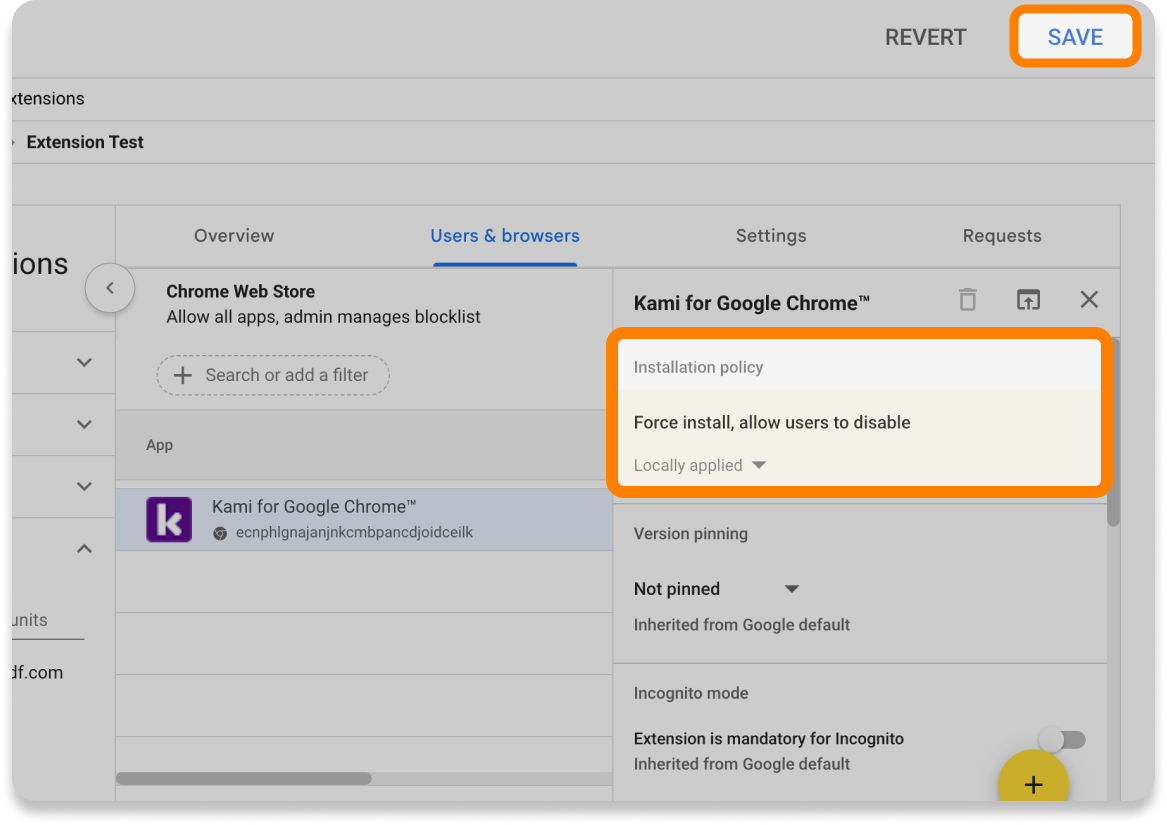
After applying this change and installing the Kami private Chrome extension, the Kami Chrome Web Store extension will automatically be turned off to avoid potential conflicts between the two extensions.